

Inventor offers the capability for a single part or assembly to manage numerous variants. Using iPart and iAssembly, you can create a master file that, upon request, generates a part for the desired variant. Each variant maintains a link to the master, enabling simultaneous changes across all associated parts.
How to create an iPart
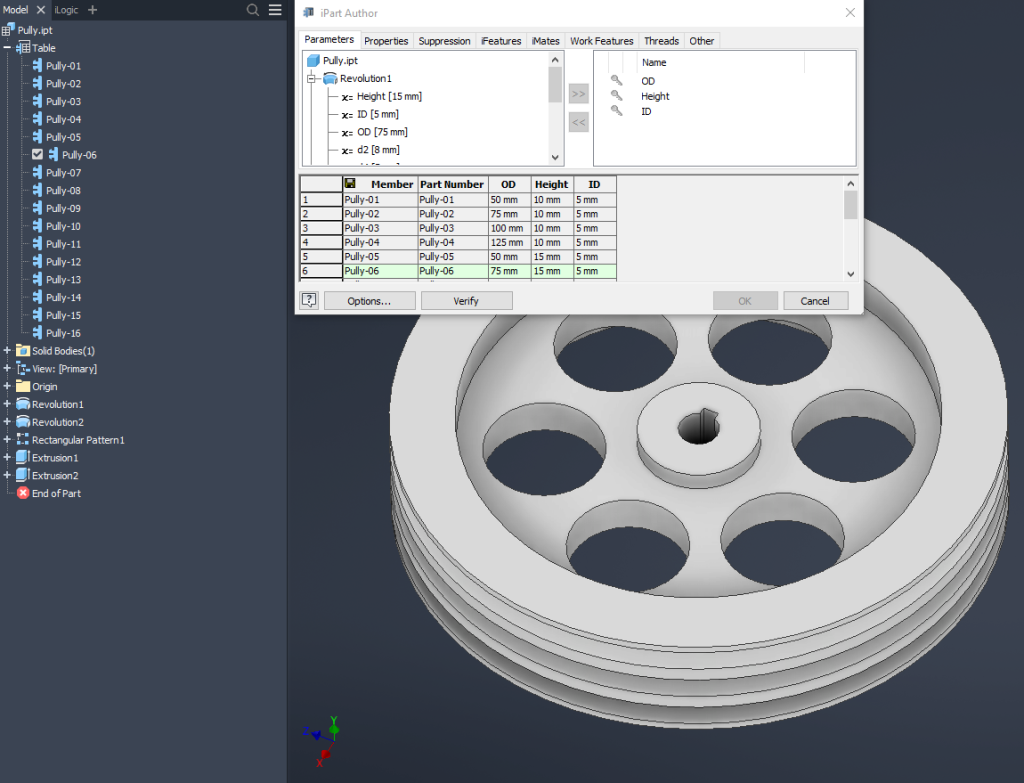
Start by creating a parametric model representing one of the configurations, and assign names to any parameters that will vary between the variants. Save the part with an appropriate name for the master file. In the ‘Manage’ tab, locate the ‘Create iPart’ button and click it to open the window shown above.
Within the editor, you have the freedom to add or remove fields you wish to modify across variants. Named parameters will typically be visible, but you can manually include any additional fields, such as properties, features, or textures.
Once all required fields are added, you can edit their values directly in the editor or opt for Excel. To utilize Excel, close the editor and right-click on the ‘Table’ in the feature tree located on the left-hand side. You should find an option for ‘Edit via Spreadsheet.’ In Excel, you can efficiently modify and add formulas to streamline the setup of your variants.
Editing iParts
After creation, editing the parts remains straightforward. In the ‘Manage’ tab, adjacent to ‘Create iPart,’ you’ll discover a dropdown menu for ‘Edit Factory Scope’ or ‘Edit Member Scope.’ This selector facilitates modifications affecting either all parts within the factory or solely the chosen variant.
Additionally, you have the ability to adjust parameters of existing parts via the iPart editor or spreadsheet. However, it’s important to note that altering the names of already generated parts is not recommended as it can break the link to the existing part.
Using iParts
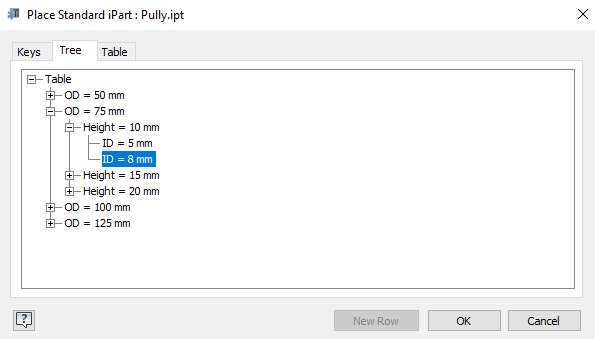
When integrating iParts into an assembly or drawing, it’s advisable to consistently utilize the master part. Upon placement, a dialog window will typically appear. This window enables you to choose the desired variant for placement. If keys have been assigned to the variants in the iPart editor, the tree tab will organize the variants according to the selected keys, while the table tab will display all the variants in the iPart editor’s table format.
Previously added iParts within an assembly can be easily substituted for other variants, maintaining the same features and carrying over constraints to the new variant. To achieve this, right-click and navigate to ‘Component,’ then ‘Replace.’ Select the master part, and the placement window should reappear, allowing the selection of another variant.
If you want to see how a VBA macro can be used to export all the variants then check out this page: Export all iPart variants
Leave a Reply